.png)
Plastic Injection Molding
Quick Glance
Unit Cost
Surface Finish
Tolerance
Cost of capital investment
Production volumes
Possible geometries
One of the most prevalent manufacturing techniques of our time that is able to produce complex and percise parts for extremely low unit costs.

Basic Injection Molding Process:
The process begins with small plastic pellets that are used to make the part. Standard colors are often offered by the manufactures but custom colors can be mixed and produced. The pellets are placed in a hopper at the top of the injection molding machine where they are then fed into the barrel.

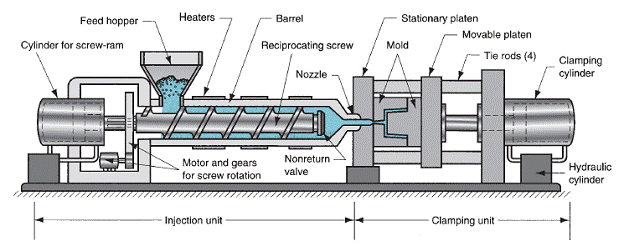
Injection Mold Machine:
The plastic pellets are heated up in the barrel by heating coils and compressed by the reciprocating screw. Toward the end of the barrel, the plastic turns into a liquid with a similar viscosity to toothpaste. The mold typically consists of two halves of the gap between making the mold cavity that will become that part. The two sections will compress under high pressure, up to a few thousand tons, in order to ensure the plastic flows properly within the mold. After the mold closed the plastic is rammed into the mold cavity, the plastic cools, and part is ejected from the mold.
Design Considerations:
- Aim for 2mm wall thickness
- Parts needs draft angle typically .5 degrees though dependant on surface finish and material
- Plastic shrinks and will leave sink marks where extra material is used
- Ribs should be 40-80% of wall thickness
- Use rounded corners and fillets to ease flow of plastic in mold
- Use a planar parting line if possible
- Add gussets to reinforce potential weak spots
- Avoid overhangs if possible

Insert Molding and Overmolding:
An additional feature of injection molding is the ability to add inserts and mold over existing molded parts. This can be a great advantage to mix different materials such as metal inserts and softer plastics to give more functionality, comfort, and design. The insert gets placed into the mold with each shot and becomes mechanically bonded into the plastic. This technique is easily recognized in a screwdriver beginning with a steel insert, hard plastic mold, and softer overmold for added comfort and grip.

Applicable Material:
Injection Molding most commonly uses Thermoplastic polymers though Thermosets and Elastomers are options as well. Thermoplastics can be remelted and remade into new parts while Thermosets are chemically bonded and can't be remolded.
Acrylic, ABS, Nylon, PLA, Polybenzimidazole (PBI), Polycarbonate (PC), Polyether sulfone (PES), Polyoxymethylene (POM), Polyetherether ketone (PEEK), Polyetherimide (PEI), Polyethylene (PE), Polyphenylene oxide (PPO), Polyphenylene sulfide (PPS), Polypropylene (PP), Polystyrene (PS), Polyvinyl chloride (PVC), Teflon/polytetrafluoroethylene (PTFE)
Advantages:
Fast cycle times
Low unit costs
Wide range of material properties available
Highly complex geometries and fine details possible
Good surface finish
Can be highly automated
Good tolerances and low scrap rates
Disadvantages:
High Capital Costs
Difficult to change molds especially decreasing material
Requires mostly uniform wall thickness
Undercuts are difficult
Example Products:
One of the most commonly used production techniques and most plastic products use this technique if not blow molded.
Electronics housings, bottle caps, lawn chairs, storage bins, keyboards, gears, fans, sunglasses, tool handles, disposable cutlery, pens, gaming controllers, plastic cups, model cars and airplanes, tool housings, and so much more


Looking to learn more about injection molding or planning on using injection molding for your product?
See something you think we should add or edit in this article? Let us know.
Learn more about molding in our next article.